Calculating Time with Excel Formulas
How often have you looked at your watch and typed the current time into your worksheet? Or tried to convert from one time zone to another and produced an error? Or wondered why a time shows up looking like “0.9285”?
Fortunately, these questions are easy to answer once you understand how Excel time formulas work. This article:
-
- Explains some basic time formulas such as NOW() and TIME(),
- Shows how to add and subtract times, and
- Uses these in two sample workbooks: a timesheet calculator and a time zone converter.
The NOW() Function
NOW() returns the current date and time from your computer.
You can reformat the result by right-clicking the cell, choosing “Format Cells,” and picking a different time format.
If you want only the time and not the date, you can either format it as a time and pretend the date doesn’t exist, or you can use “=NOW()-TODAY()”, which subtracts the date portion and leaves only the time portion. Regardless of how you format the display, however, the underlying value remains constant until you recalculate.
Whenever you recalculate (or whenever Excel recalculates automatically because other cells have changed), the function pulls the time as of that moment. Use this function when you need an always-updated current time in your calculations.
NOTE: Someone who opens the worksheet in six months will see her own current date and time in this field, not the date and time that you saved the workbook.
The Shortcut Control-Shift-;
When you need to save a permanent record of the current time, hold down the Control key and the Shift key while you type a semicolon (;). Like NOW(), it returns the current system time. Unlike NOW(), however, it stamps the time as a fixed value. You can change the format, but the value is always the same.
Similarly, you can save the current date by holding down the Control key (but not the Shift key) and typing a semicolon.
Because it saves the value and not an updateable function, someone who opens the worksheet in six months will see the date and time that you stamped on the page, not her own current date and time.
The TIME() Function
Both the NOW() function and the Ctrl-Shift-; shortcut return the current system time. What if you need to store a value for some other time?
When you need to convert a specific number of hours, minutes, and seconds to an Excel time, use the TIME() function with the parameters the numbers of hours, minutes, and seconds. Typing “=TIME(14, 30, 10)” produces:
Be sure to enter the hours using a 24-hour clock.
Adding and Subtracting Times
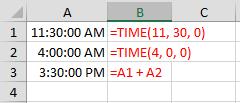
When you need to add or subtract a fixed number of hours, minutes, or seconds to a time value, just add or subtract the way you would any decimals. If you add 4 hours to 11:30 AM, you get 3:30 PM:
To understand time arithmetic more fully, you need to understand first how Excel stores times.
Try this: in an empty cell, type “=NOW()” and hit <ENTER>. The result shows the current date and time, probably formatted like this:
6/26/2014 9:57
Next, right-click the cell, choose “Format Cells,” and pick “General.” The result should look something like this:
41816.41498
This is how Excel stores date/times—the date is the number to the left of the decimal, and time is the decimal portion of the number, where 0 corresponds to 12:00 AM, 1 is midnight, and every other time of the day falls somewhere in between. Times are decimals values between 0 and 1.
To convert a time to its decimal value, divide the hours (using the 24-hour clock) by 24 (the number of hours in a full day):
- 12:00:00 PM (Noon) is exactly halfway through the day, so the decimal value is 1 / 2 = 0.5.
- 6:00:00 AM is one-fourth of the day, so the decimal value is 1 / 4 = 0.25.
- 9:00:00 PM corresponds to 21:00:00, so the decimal value is 21 / 24 = 0.875.
On the other hand, to convert a time decimal value to the number of hours, multiply by 24.
Because times are simply numbers between 0 and 1, you can do any arithmetic on times, just as you would with any other decimal numbers. Add them, subtract them, multiply them by two, divide them by four—just like any other decimal numbers.
But there are a couple of warnings as you get into date arithmetic.
Why Does 15 hours + 18 hours = 9 hours?
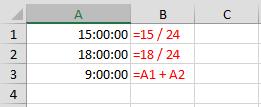
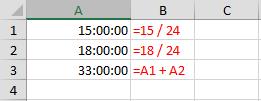
Try this, using a 24-hour format:
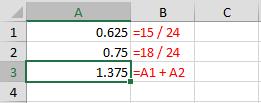
Right-click on Cells A1 through A3, choose “Format Cells,” and select “General.”
This shows that Excel did, in fact, add the two time values, which resulted in a number greater than one, meaning more than a full day. Like an odometer, however, Excel’s standard time formats roll over and show only the decimal portion—0.375, which equals 9:00:00.
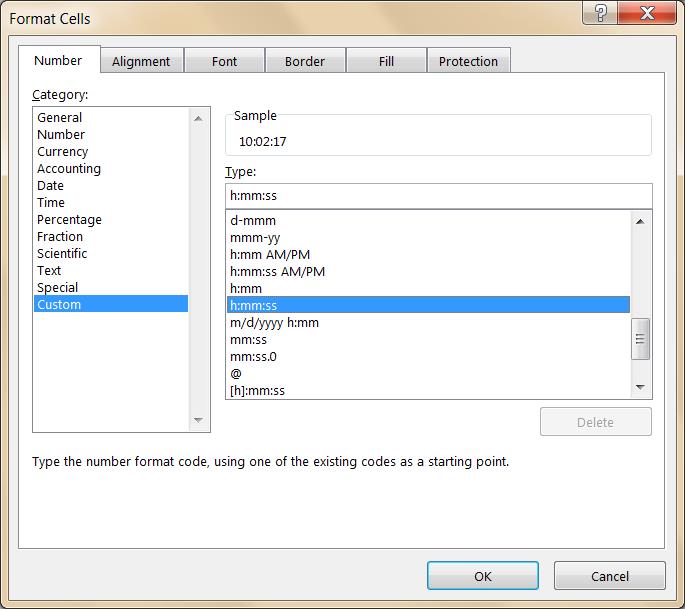
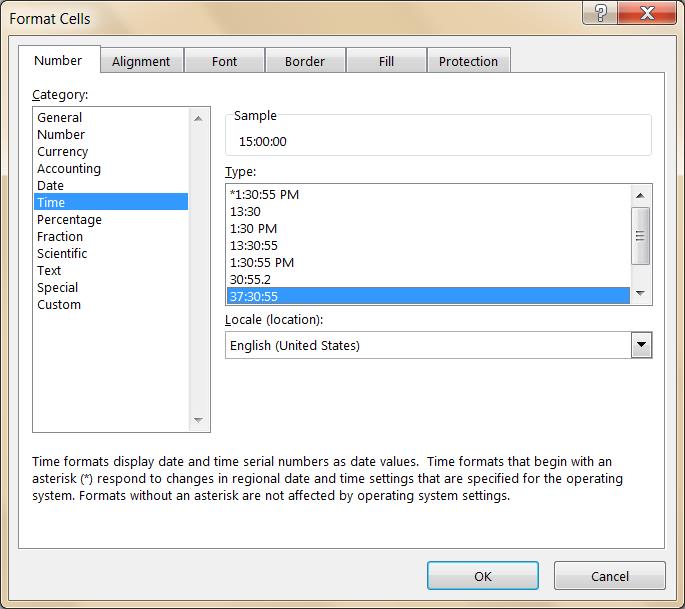
When you need to show hours greater than 24, such as when adding up hours from a timesheet, choose a time format that displays the larger numbers:
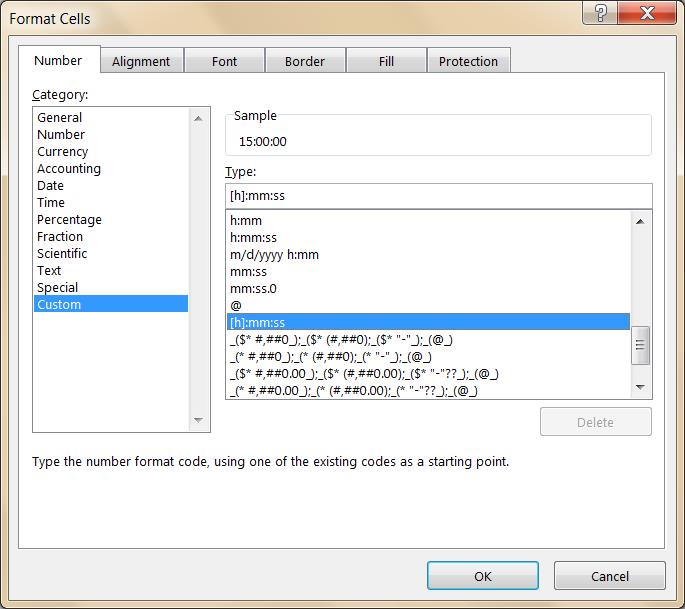
When working with customer formats, surround the hours with square brackets ([]):
Applying that format to this example produces 33 hours, as expected:
Why Does 4 hours – 12 hours Produce an Error?
This situation arises when you’re calculating how far in advance you need to begin a task so that it will be completed by the target time. It arises also in certain time zone conversions that cross over into the prior day—such as calculating London time when it’s 5:00 AM in Tokyo. (See the time zone converter below and the error-trapping used in the calculation.)
Unfortunately, Excel does not like negative times, so you’ll need to introduce an error-trapping formula. Whenever subtracting times could result in a negative time, wrap it in an IF() statement which adds 1 to the result. (In cases which might result in something prior to one day back, you’ll need to adjust your formula even further.)
Finally, you’re prepared for useful applications of these formulas.
Timesheet Calculator
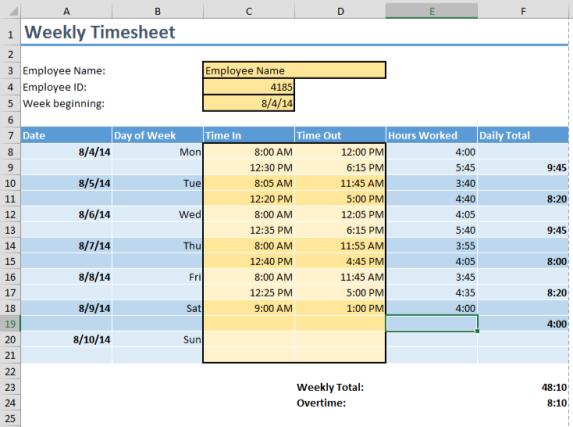
The attached timesheet calculator uses simple time subtraction to determine the number of hours worked in each segment: time out – time in. The format for hours worked is “[h]:mm,” which ignores seconds and does not display AM or PM. The calculation traps for negative numbers using an IF() statement: if the time in is greater than the time out, then it displays the message, “Time out must be later than time in.”
Next, the calculator adds the duration of each segment in each day to reach a daily total. Again, this is simple time arithmetic: “=E8 + E9”.
The weekly total sums the daily totals and uses a format of “[h]:mm.” The square brackets around the hours allow this formula to show values greater than 24 hours.
Finally, the overtime formula determines whether the number of weekly hours is greater than 40. Remember that 40 must first be converted into a fraction of a day by dividing by 24, so the formula compares the hours worked to 40/24. If greater, then the overtime formula subtracts 40/24 from the hours worked and returns the difference. If less, then the overtime formula returns 0:00.
Time Zone Converter
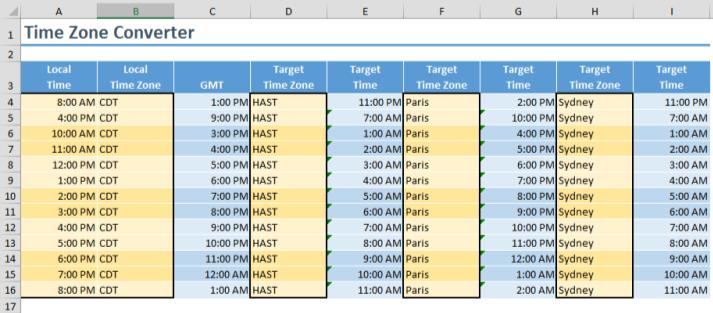
In the attached time zone converter enter a starting time and time zone in Columns A and B (in the gold cells).
Column C converts the local time to Greenwich Mean Time, also known as UTC (Coordinated Universal Time), by subtracting the differential from GMT. Remember that the differential (in hours) must be converted to a decimal first by dividing by 24. Because this could result in a negative time if the local time is far east and is early in the morning, the formula uses an IF() statement, adding a 1 if the result would be negative.
In Columns D, F, and H, enter target time zones for the conversion. Columns E, G, and I calculate the target times by starting with the GMT base and adding the differential from GMT.
All of these calculations use data from the table on the “Time Zone Data” tab. Feel free to add records, for this table is far from including all worldwide time zones. Note that you can define the time zone abbreviation in Column A using any format that you like. The sample data included shows some with abbreviations (GMT, EST, PDT, etc.) and others using cities. Whatever values you enter here will show up in the pick list for entering data in Columns B, D, F, and H of the converter.
Next Steps
This is just the beginning of calculating formulas using times. From this point, you can develop far more complicated formulas, such as determining the average time required to complete a task, the maximum time between phone calls, etc. As long as you remember that times are just decimal numbers that represent portions of a day, you can work through any remaining calculations. You have the tools, and you know how to use them. Enjoy!


