It’s About Time! Excel Timesheet Formulas
Date and time math is one of the strengths of Excel. However, it helps to know a few secrets and hidden gems to make your timesheet calculations work smoothly. In this practice, we’ll work with several different Excel functions. But first we need a basis from which to understand how Excel works with dates and times.
To work along, download ExcelTimesheetFormulas.xlsx
The Basics
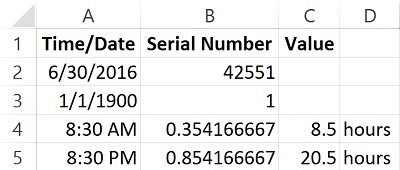
Excel interprets dates and times as numbers. You might see 6/30/2016, but Excel is treating it as 42,551. To be precise, that’s 42,551 days after January 1, 1900. All dates from that date forward are assigned a sequential serial number. And then there’s time. You might type in 8:30 AM, but Excel treats it as 0.354167. This decimal value represents a fraction of a 24-hour day. If you multiplied 24 by this number you would get 8.5 hours which is what 8:30 means. To be clear, if you entered 8:30 PM, you’d get a different number. 0.854167. Multiply that by 24 and you get 20.5. On a 24 hour clock 20 is 8:00 PM and, of course .5 of an hour is 30 minutes.
It is important that dates and times be entered in the appropriate format in order to perform calculations on them. You’ll know if you have done it correctly because it will automatically right justify. If you think about it, when you enter a text value, it automatically left justifies by default. So, if you enter times and dates and they left justify, you will need to correct your data entry. Try entering times in the yellow cells on the Basics worksheet; see if it gives you both the decimal time value and the calculated value in the blue cells.
The TIME Function
Not everyone is lucky enough to get their data imports in the right condition for Excel to use. So you have the TIME function to help work with the data the way you get it. For example, let’s say you get these in 4 different cells, in columns titled Hour, Minute, Seconds, AM/PM. With the TIME function you could reassemble this data into a valid time that Excel could use to calculate payable or billable time. If you input this formula on row 2 of the HOURS worksheet: =TIME(A2,B2,C2)
You should get the correct time. However, if you copy it down to the next row, the time will incorrectly show the AM value, rather than the PM value. We need to add some IF logic to help Excel determine what the real time value should be.
=IF(D3=”PM”,TIME(A3+12,B3,C3),TIME(A3,B3,C3)
Let’s break that apart to see what we’re really saying here. If D3, contains the text “PM”, then add 12 to give the correct time. (Remember our 20.5 value from above that was evaluated as 8:30 PM?). Otherwise, just do the basic TIME calculation.
Accounting for Overtime
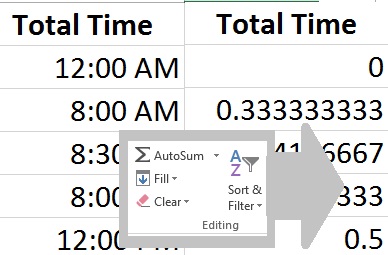
With the way Excel works with time and date data, calculating payroll should work just fine, unless you have different calculations for overtime. If you calculate overtime as any number of hours over 8 hours in a day, simply subtracting your starting time from your finishing time would not provide you with the right information. First of all, if we do that and there was a day where no time was entered, such as in our example, on Sunday, the result shows as 12:00 AM. We’ll use the Clear Format button to get this column at least displaying correctly.
Now we can multiply it by 24 in column F, then, test to see whether it is greater than 8 in column G. If it is, then we can subtract 8 from the total time to get the overtime amount. To test if the value is greater than 8, the formula is simply F2>8, which will resolve to either TRUE or FALSE. We can write an IF statement in column H to determine if the day has overtime hours, and if it does to show the difference between total hours and 8, otherwise 0: =IF(G2=FALSE,0,F2-8)
How did you do? Check out your results in the solutions file: ExcelTimesheetFormulasSolution.xlsx


