Tips for Data Management in Excel
Becoming an Excel expert is more than learning functions and cobbling together formulas. A significant part of using Excel to its full potential is knowing the art of data management. This includes everything from knowing how to set up your worksheets to managing data entry to good maintenance practices. Here are several tips to good data management that will help you get more out of your data and manage it well over time.
Set up Your Data
Designing your tables, headings and planning your workbooks before you begin entering or downloading data will save you time and headaches in the long run. Here are several things to think about before committing your data to Excel:
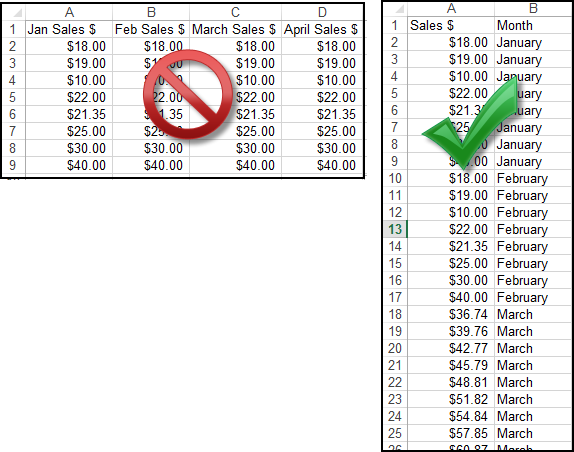
- Plan your headings. Don’t split up your data just to categorize it. Instead, create a column for the category and let your charts and PivotTables organize it in reports.
- Formulas should never contain numbers. Instead, assign a cell to each variable in the formula and then reference the cell. This will make it much easier to find and make changes to those variables in the future.
- Resist the urge to format your spreadsheets with extra headings subtotals or empty rows and columns to make the sheets visually pleasing. Keep your data tight and efficient. Then, use charts, graphs and PivotTables to share your analyses.
- Get in the habit of using fixed cell references for your formulas. This allows you to more easily copy/paste and re-use formulas throughout the workbook and also reduces errors.
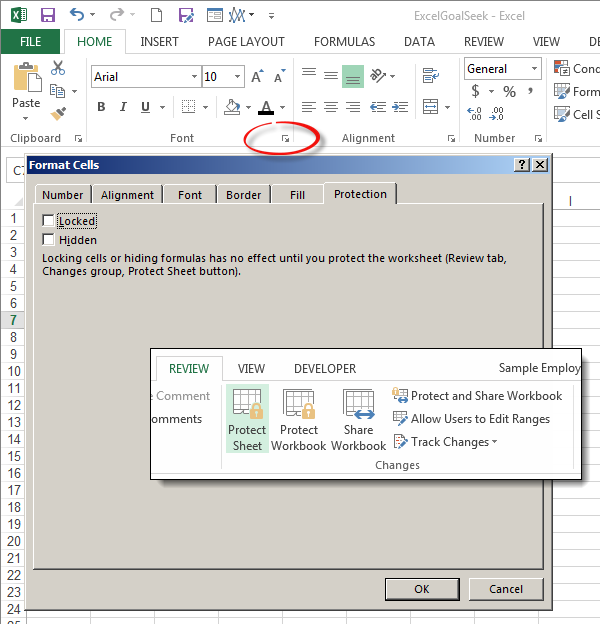
- Lock cells with formulas so they are protected from mis-typing or deleting. In a very large spreadsheet, finding a single accidental keystroke can be harder than the proverbial needle in a haystack. To lock individual cells (without protecting an entire sheet, etc.):
- In an unprotected worksheet, type CTRL-A to select the entire worksheet.
- Click the dialog box launcher in the Font group on the Home tab.
- Click the Protection tab in the Format Cells dialog box.
- Un-check Locked and click OK.
- Then, select ONLY the cells you want to protect (those with formulas). Repeat Steps 2-3.
- Re-check Locked only for those cells and click OK.
- On the Review tab, click Protect Sheet.
Enter Your Data
Once you have designed your tables and workbooks, you will want to make sure that the data itself is consistent and accurate:
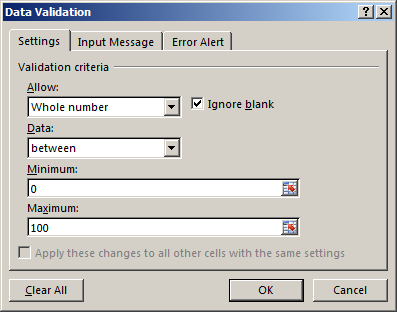
- Use data validation. This will help ensure that the data formats are correct (09 vs. 2009 for example) and catch common mistakes such as numbers out of range. The Excel data validation feature also lets you prompt the user for the correct data and warns them when they have entered incorrectly.
- Use forms. Especially if your records are to be entered by typing at the keyboard, as opposed to an import from other sources, a form can create a user-friendly interface that facilitates faster entry and also protects the existing data from accidental overwriting.
- If you are using imported data, resist the temptation to spend time editing it into your style and formats. This is likely to introduce errors and wastes time. Instead, proceed with your analysis and reporting in other sheets where you can design the look as you create the report.
Maintain Your Data
As you add and delete records over time, you will inevitably reach a point where old records need to be purged, duplicates need to be reconciled and data needs to be re-formatted. The feature you’ll need depends upon your problem, but here is a list of articles that can help with some of the most common.
How to Find & Eliminate (or Use!) Duplicates in Excel Data
Remove Extra Spaces from Excel Data
Learn about the Excel Find Formula
Most importantly, before you begin ANY maintenance on an Excel database, you must back it up! Make a copy or two and save the originals in a safe place. Then, if anything goes wrong, you can recover and start over.


