Two Ways to Compare Columns in Excel
Did you ever squint at two columns of data and examine them row by row to compare the values? Excel can do all that hard work for you in three different ways.
Download CompareColumnsinExcel.xlsx to follow along.
Note: All values will appear highlighted on the This Equals That Worksheet, initially.
Method One: This Equals That
If you have two lists that should be identical, but you suspect they might not be, you can put in a simple formula that sets one cell equal to another. If they are not equal, Excel returns the value FALSE. If they are, Excel returns the value TRUE. In our example, we see that Ali Mazzurah’s name has a missing h at the end, and Kathleen Kelly’s name appears with her middle initial V. in the list on the left. So, these appear as FALSE in the third column where the formula attempts to state that the value in column B is equal to the value in column C. Excel says “No it’s not!” by returning the value FALSE.
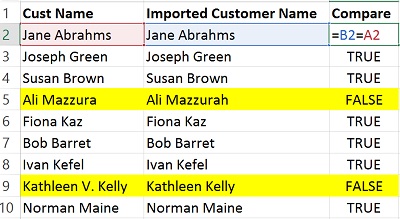
To see just your FALSE values, you can filter or apply Conditional Formatting to highlight the false ones.
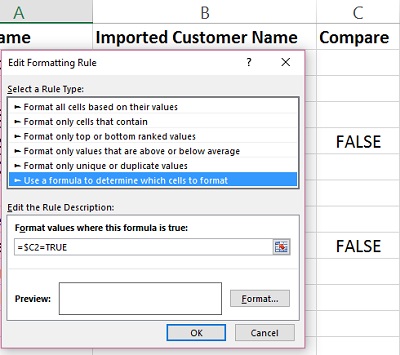
| In the sample workbook, with any value in column C selected, click on the Conditional Formatting button on the Home tab and choose Manage Rules to see how to highlight a whole row based on the value in one column. |
This can be done across worksheets or even workbooks!
Method Two: VLookUp
Don’t run away! Even if you’ve never worked with a VLookUp before, this method is a good one to learn it on. Think about what you do manually to compare two lists you may have printed out. You have a value from one list that you’re pointing to with one finger. With the other finger, you’re moving down the list of likely values with the expectation that you’ll find it. If you find it, you might check it off or cross it off one of the lists, meaning it was found. Otherwise you might highlight it or circle it if it was not found in the other list. Let’s see how we can use VLookUp to do this for us, faster.
The syntax of a VLookUp formula can be thought of in this way:
- What do you want to look up?
- Where do you want to look for it?
- Which column do you want Excel to return if it finds it?
- What do you want Excel to do if it can’t find it?
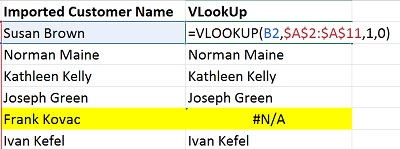
In our case, we’re only comparing two columns, one in each of two separate lists. So, the “what” is the value we want to look up. The “where” is the other list. The which column is the same column we’re looking it up in, so 1. And, we want Excel to tell us if it can’t find it, we tell it not to return something close to our value (range), but our value exactly. Like our FALSE result above, VLookUp returns #N/A, telling us the thing we’re looking up is “not available.”
| The “where” or Table Array field should be expressed as an Absolute Cell Reference ($A$1) or a named range so it doesn’t “travel” as we copy our formula down the list. |
In our example, the two lists are sorted differently. We locate all the names in column B in column A, but one.
Finishing Touches
The information that Excel found the value we were looking up isn’t really necessary. We really only need to see if it isn’t found. We can use an If statement to test the result of the VLookUp and return a blank if the VLookUp does not result in an #N/A.
In our first example, we could use Conditional Formatting to change the font to white if the value is TRUE, thereby making it “invisible” as long as the cell shading was empty or white. Essentially, if the value is TRUE, you want to color the font the same as the background. Another way to do this is to use the Custom format. This takes a value and changes its font color to match the background color, whatever it is!
| Although TRUE and FALSE look like text values, they are actually what’s called logical values, they are treated by Excel more like numbers than as text. |
Check out CompareColumnsinExcel-solution.xlsx to see how you did!
